- Mik Bromley
- Aug 15, 2021
- 7 min read
Updated: Jul 26, 2023

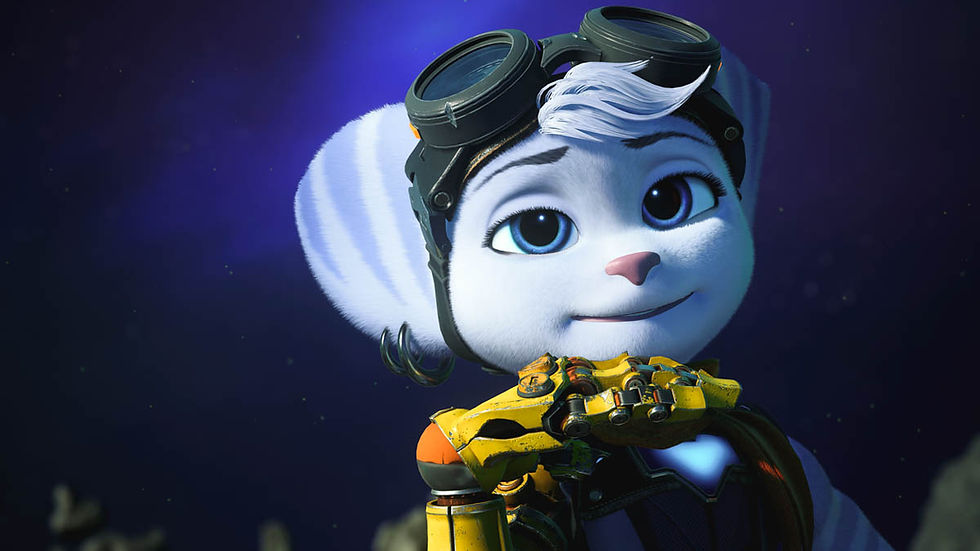
The long-awaited return of Ratchet & Clank has easily been one of the highlights of 2021 so far, and its combination of engaging characters with outstanding visuals, incredible lighting and those all-important ray-traced reflections have made it especially appealing to virtual photographers. A good thing then, that Rift Apart benefits from the photo mode prowess of Insomniac Games and, to help you take your shots to another dimension, here are some of my top tips to get the best out of it.
Take a shortcut:
Quick access to any photo mode is essential when it comes to conveniently capturing the right moment, so be sure to set up a shortcut button binding seeing as it is disabled by default. Found in the game's Controls & Shortcuts settings, photo mode access can be assigned to any one of the D-pad directions in place of a weapon so that it is always close at hand. While you're there, why not also try adding one for slow-motion gameplay to make it even easier to freeze the action.

- PHOTO MODE // SHORTCUT -
Find a workflow:
Along with the usual tabbed UI for the various camera tools and settings, the Rift Apart photo mode is separated into 4 distinct modes that group together certain features including lighting adjustment, character posing and stickers.
Depending on the style of work you are aiming for, some of these are more useful than others, so get familiar with the modes and find an efficient workflow that focuses on the tools you need. For example, I might typically start by setting up the camera's field of view and depth of field before heading over to the Lighting Mode and then Character posing. From there it is back to the camera mode to tweak the composition and capture.

- PHOTO MODE // WORKFLOW -
The right camera for the job:
Unlike some more restricted photo modes, Ratchet & Clank's comes with a choice in the type of camera movement for different scenarios. The Free camera should be the go to choice most of the time as the uninhibited look-direction and non-tethered camera positioning within a reasonably sized bounding sphere make it simple to get an angle on any nearby subject, but switching to the optional Orbit camera can be useful for conveniently adjusting portrait angles on the playable character with just one stick input.
- CAMERA MODES // R&C: RIFT APART -
Narrow the field of view:
A wide field of view angle can be great to take a lot in or to put some exaggerated perspective on a shot, but Rift Apart is a game full of really high quality assets and impressively detailed character models that should not be missed. Narrowing the field of view not only declutters the frame and focuses attention on the subject, but is also a perfect way to make those detailed models a more dominant feature.
Just remember that with the non-numerical slider settings used here, you'll be selecting a view by eye or by experience rather than with any specific focal length value, but it doesn't take long to get a feel for where on the scale to go.
- WIDE FOV // NARROW FOV -
Create depth of field:
With a chosen subject / object neatly framed in shot, creating an authentic depth of field is essential to make it stand out from background distractions and to add some photographic realism. Crank up the main Aperture slider to determine the amount of background defocus that is applied, and then simply move the focus distance to control how far into the scene the blur begins and what is kept in focus.
Don't stop there though, use the "near" versions of the aperture and focus distance settings to repeat the trick on the foreground close to the camera and complete the field depth.

Precision focusing:
Going hand-in-hand with the previous tip, placing the point of focus precisely and accurately is important in achieving a sharply focused subject and leading the viewer's eye to the desired area of the shot. Unfortunately, the focus distance steps in Rift Apart can be too large, especially at narrower fields of view, but careful adjustment of the camera position can add that much-needed precision.
Simply set the focus distance setting to the step that is closest to where you want it, and then tweak the distance of this fixed focus point relative to the subject by sliding the camera dolly back and forward until it is in exactly the right spot, adjusting the field of view as necessary to maintain framing.
- PHOTO MODE // DOLLY FOCUS -
Strike a pose:
Our favourite Lombax subjects are certainly not camera shy and, with a whole mode dedicated to selecting a characterful pose and fitting facial expression, there is always a shot waiting. You can even select a weapon to be held, along with additional action poses for each, and toggle the visibility of individual armour pieces so those big glossy eyes need not be obscured by a helmet all of the time. For something less "manufactured", also be sure to take advantage of the wide range of natural body positions that can be found in the game's excellent animations, even if some of them do get a bit...stretchy!

- POSER // R&C: RIFT APART -
Travel the worlds:
If there is one good thing about having a game set across various planets and even alternate dimensions, it is that there is no shortage of locations to serve as interesting backdrops for your photographic exploits. Although there is no chapter select to be able to replay certain boss fights at will, it is quick and easy to jump back into Ratchet's or Rivet's spaceship and revisit all of the main locations. Take advantage of that and mix things up with different settings and of course, all of the varied NPC inhabitants.
- LOCATIONS // R&C: RIFT APART -
A natural glow:
Wherever you choose to go, Ratchet's universe is awash with some of the most realistic in-game lighting around, but you don't just have to settle for the conditions as you find them. The Natural Light settings in the Lighting Mode offer manual adjustment of the elevation angle and direction of the sun (if there is one), as well as the brightness of ambient light cast from the environment.
Setting the latter to a high value can be used to create a soft bloom effect in the shot, while dropping everything to zero is a great way to get shadow silhouettes on the optional coloured backgrounds.
- SHADOW // BLOOM -
Back to the studio:
Should the environmental light not be quite right, the 3-point studio setup is complete with both omnidirectional sphere and focused spot lights, each with customisable colour and intensity, ready to compliment the existing light or replace it entirely.
Mix and match the available lights, and try different illumination directions to achieve coloured key light, shadow fill, or defined edge lighting from above and behind. Alternately, a single lamp can be used to put a glint in the eye for more flattering portraits.

- RIVET // R&C: RIFT APART -
Take an overview:
Probably the trickiest part of setting up the studio lights is having the spatial awareness to know where each one is within the scene and which direction it is shining. To get your bearings, use the fact that a newly placed lamp starts off directly below the current camera position and orbits around the main character, even when they are hidden.
For extra convenience, don't forget that there is a secondary lighting camera view that can be used to get a wider view of the positioning of light rights without disrupting the composition of the shot.
Capture Movement:
Placed so subtly on the first UI tab that you might easily miss it, the Visual Effects toggle is ready and waiting to add some moving interest to photo mode captures. While the characters and action remain frozen as usual, enabling the visual effects option will allow the animation within the surrounding environment continue to play.
This includes the likes of weather effects, hologrammatic signs, rocket boosters and even interdimensional portals, just be aware that the effects from weapon fire will also play out and quickly disappear.

- VISUAL EFFECTS // PLAY -
Hit on the robots:
It is no secret that the NPC's in Rift Apart make some of the best photographic interests thanks to high quality character models and designs that are loaded with personality, but the robots of Nefarious City have to be my favourite.
There are lots of opportunities to be had as these mechanical inhabitants go about their business but, for a little extra, try whipping out the omniwrench / hammer and giving the short ones with LCD faces a quick whack! Ok, I know that seems mean, but notice how it makes the bot cycle through a range of emotional expressions that can completely change the meaning of a shot.
- WHACK-A-BOT // R&C: RIFT APART -
Remove chromatic aberration:
As part of the in-game presentation, Ratchet & Clank has a chromatic aberration effect that adds some distortion and colour channel separation around the edges of the frame. It does create a nicely stylised low-fi look, but is definitely not conducive to getting clean and crisp photo mode shots of the highest quality.
With a lack of any aberration option from within the photo mode, it may seem like there is no way to avoid the effect, but a quick trip to the main game settings will reveal a toggle to disable it across the board. Don't do the same for the depth of field option though or the manual aperture and focus controls will become ineffective.
- ABERRATION ON // ABERRATION OFF -
Reflect on the possibilities:
Ray-traced reflections may be all the rage in gaming these days and whether you play with RT enabled or not, there is no denying the great photographic opportunities they hold for photo mode. Luckily, Insomniac know this too and so, regardless of if you play using the Performance or Fidelity graphics option, the photo mode will always revert to the latter with fully ray-traced reflections enabled. Now go and take advantage of them.

- ON REFLECTION // R&C: RIFT APART -
Hang out at Zurkie's:
After a long day venturing across planets, through rifts and into pocket dimensions, easily my favourite place to end up is back at Zurkie's Gastropub in the Scarstu Debris Field. Not only is there an endless supply of foes to take on in the Battleplex, but it is a hub of activity full of NPC's from all over the galaxy kicking back together. Visit at different points in the story, and the clientele will change too, oh, and did I mention there is a juke box...? There is.


Comments